SMS Magic - Adding a New User
 IMPORTANT: At this time, the easiest way to access SMS Magic is to login to Zoho using Freddie's credentials.
IMPORTANT: At this time, the easiest way to access SMS Magic is to login to Zoho using Freddie's credentials.
General Information
What is SMS Magic? - SMS Magic integrates SMS text messaging into Zoho CRM to streamline communication and make it easier to engage leads.
- For Support/provisioning new phone numbers, contact : care@screen-magic.com
- When provisioning, always provide the area code that the franchisee requested within the request form, along with the ScentHound Corporate Account ID!
- Please use the checklist attached to this article when setting up SMS Magic to ensure nothing is missed!
Accessing SMS Magic
- Once logged into Zoho, navigate to the CRM Module > Leads tab
- Select any lead > then SMS Text, this will take you to SMS Magic's web page
Licensing
- If we do not have enough licenses, one will need to be purchased
- Once logged into SMS Magic, select the "buy now" tab
- Select 1 "SMS conversational messaging license" and proceed to pay
- If using Freddie's account, payment details should be saved already
Requests for New User
Request to set up new users will appear as a ticket in Zoho Desk containing a the SMS Magic Request Form filled out by the franchisee (Form found in Zoho Forms, see image below)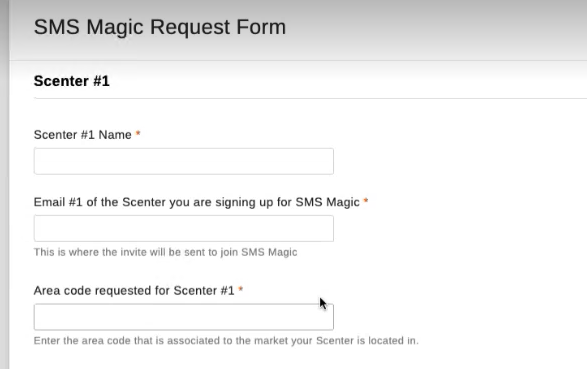
Provisioning the Phone Number
IMPORTANT: Always use the "ScentHound Corporate" Account ID when requesting provision, disregard "ScentHound Corporate Child"
- Upon receiving a ticket, the first step is to contact care@screen-magic.com and request they provision the phone number/numbers you are setting up, include the requested area codes, and provide them with the ScentHound Corporate SMS Magic account ID (This can be found within SMS Magic > account settings ) - Current SMS Magic Account ID: 80036989
Inviting the User
- Within SMS Magic, Navigate to Account Settings using the drop down menu located at the top right hand of the website
- Select User Management > Invite User > and input the email submitted by the franchisee on the SMS Magic Request Form > Select Invite
- The user will receive an email to set up their account, they will need to do this before we proceed
- Once they set it up, their status will change from "pending" to "active" in the user management tab, and display the Scenter name (see image below)
Associating Phone Number (Sender ID) to Newly Added User
- Once SMS Magic has provisioned the phone number, and the franchisee has set up their account we link the phone number to the user
- Select the Settings tab at the top of the web page > then SMS Services
- Using the tabs on the left, select "My Sender IDs"
- Locate the provisioned phone number by using the area code that they requested
- Select the 3 dots > Assign Sender ID
- Search for the Scenter Name in the "Assign Sender ID to Users" drop down menu > select it and save
Creating SMS Sender Id in Zoho CRM
- Navigate back to Zoho CRM
- Find the module SMS SenderId
- Select Create SMS SenderId
- SMS SenderId Name field = the SMS Sender ID from SMS Magic (the phone number we assigned earlier)
- SenderId field = Sender ID (phone number)
- SMS Manager field = the franchisee owner email (ex: va011dl@scenthound)
- SMS SenderId Owner = location email
- Externalid = Sender ID (phone number)
4. Save changes
Setting up Zoho CRM Workflows
5. Navigate back to CRM > Select the cog to open CRM Setup
6. Under Automation > select Workflow Rules
7. Select the dropdown under "All Modules" and filter for SMS History
8. Select the SMS History Owner Assign (Use the most recent version, ex: SMS History Owner Assign v2)
9. Select + Add another Condition
10. Change the first drop field to "SMS History Name"
11. Change the field to "Contains"
13. Enter "IN" into the last field
Example:
14. Select the plus button to add another condition
15. Field one should be "SenderId"
16. Field two should be "Is"
17. Enter the SenderId (phone number) in the last field
18. Select Next > and under the flow you just created, select "Assign Owner"
19. Under Select Users > assign the Scenters email
20. Select "Save and Associate"
Example of Completed Workflow: